Wait Block

The Wait block makes your program wait for something before continuing to the next block in the sequence. You can wait for a certain amount of time, for a sensor to reach a certain value, or for a sensor value to change.
Tips and Tricks
The Wait block does not make your robot stop. If any motors are on at the beginning of the block, they will stay on during the wait.
Choose the Wait Mode


Mode Selector
Inputs

Use the Mode Selector to select a Wait mode. Choose the Time mode to wait for a specified amount of time in seconds. Choose a sensor type and a Compare mode to wait for the sensor to reach a certain value. Choose a sensor type and a Change mode to wait for the sensor to change to a new value or by a certain amount.

The Inputs available will change depending on the mode.
Time


In the Time mode, the Wait block waits for the amount of time you specify in the Seconds input. The time is measured from the start of the Wait block.
Tips and Tricks
You can include a decimal point in Seconds. For example, 2.5 seconds would wait for two and a half seconds.
See programming examples in the Display block Keeping Displayed Items Visible section.
Sensor Compare Modes
Each of the sensor types listed in the Wait block has one or more Compare modes. A Compare mode will continuously read data from the sensor and wait for it to reach a value that you specify.

Some types of sensor data can be compared to a Threshold Value, and other types can be compared to certain specific values.
Waiting for a Sensor Threshold Value
In a sensor Compare mode with a Threshold Value input, the Wait block will continuously read Numeric data from the sensor and compare it to a Threshold Value that you specify. The block stops waiting when the threshold comparison is True. For example, you could wait until the Color Sensor detects a Reflected Light Intensity value that is less than 50.


Mode Selector
Port Selector
Compare Type input
Threshold Value input
Measured Value output

Use the Mode Selector to choose a sensor Compare mode with a Threshold Value input. If the mode uses a port, use the Port Selector to make sure that the port matches the port on the EV3 Brick that the sensor or motor is connected to.

Choose the type of comparison you want to use from the Compare Type list, and enter the Threshold Value. The Wait block will wait until the threshold comparison is True.
Tips and Tricks
If the specified comparison is already True at the beginning of the Wait block, the program will immediately continue to the next block.
The final sensor value is output in Measured Value. You could use this to determine the exact sensor data value that made the threshold test True.

For more information on using the different sensor types and what data they provide, see the “Using Sensors” help articles.
Waiting for Specific Sensor Values
"The following Compare modes of the Wait block allow you to wait for specific sensor values:

Brick Buttons – Compare – Brick Buttons
Color Sensor – Compare – Color
Infrared Sensor – Compare – Remote
Touch Sensor – Compare – State
Ultrasonic Sensor – Compare – Presence/Listen
Messaging – Compare Modes"
Brick Buttons – Compare – Brick Buttons


You can wait for one or more of the Brick Buttons to be Pressed, Released, or Bumped. For example, you could wait for the Center button to be Pressed. See Using the Brick Buttons for more information about the Brick Buttons.

Select one or more Brick Buttons in the input Set of Brick Button IDs and select Released, Pressed, or Bumped as the Action. The Wait block will wait until any one of the selected buttons to do the selected action. The Button ID output indicates which button (if any) is pressed at the end."
Example
This program makes a robot drive forward until the Center button is pressed, then it stops and makes a sound.
Color Sensor – Compare - Color


You can wait for the Color Sensor to detect one or more specified colors. For example, you could wait for the Color Sensor to detect black. See Using the Color Sensor for more information about the Color Sensor in Color mode.

Select one or more colors in the Set of Colors input. The block will wait until any one of the selected colors is detected. The detected color is output in Color."
Infrared Sensor – Compare - Remote


You can wait for a button to be pressed on the IR Beacon. See Using the Infrared Sensor Remote Mode for more information about the Infrared Sensor.

Select one or more buttons in the Set of Remote Button IDs and enter the Channel number for the IR Beacon. The block will wait until any one of the selected buttons is pressed. The ID of the button pressed is output in Button ID."
Example
This program makes a motor start turning when Button 1 on the IR Beacon is pressed, then stop turning when the button is released. The release is detected by waiting for no button to be pressed (Button ID = 0).
Touch Sensor – Compare - State


You can wait for a Touch Sensor to be Pressed, Released, or Bumped. See Using the Touch Sensor for more information.

Select Released, Pressed, or Bumped in the State input. The block will wait for the touch sensor to be in the selected state.
Ultrasonic Sensor – Compare - Presence/Listen


You can wait for the Ultrasonic Sensor to detect a signal from another Ultrasonic Sensor nearby. The block will wait until an ultrasonic signal is detected. See Using the Ultrasonic Sensor for more information.
Messaging – Compare Modes


You can wait for a message to be received that matches a specified comparison. See Messaging for more information.
Sensor Change Modes
Change
Each of the sensor types listed in the Wait block has one or more Change modes. A Change mode will continuously read data from the sensor and wait for it to change to a different value, or change by an amount that you specify.

You can wait for some types of sensor data to change by a certain Amount, and other types to change to a different value.
Waiting for a Sensor to Change by a Certain Amount
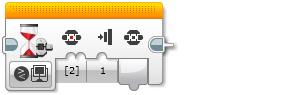
In a sensor Change mode with an Amount input, the Wait block will read a starting value from the sensor at the start of the block, then continuously read data from the sensor and wait for the value to change by the specified Amount from the starting value. You can choose the Direction of change that is required (Increase, Decrease, or Any). For example, you could wait for the Ambient Light Intensity value from the Color Sensor to increase by 10.
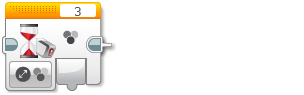


Mode Selector
Port Selector
Direction input
Amount input
Measured Value output

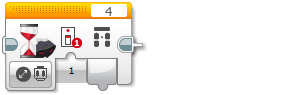
Use the Mode Selector to choose a sensor Change mode with an Amount input. If the mode uses a port, use the Port Selector to make sure that the port matches the port on the EV3 Brick that the sensor or motor is connected to.

Choose the type of direction of change you want to wait for in the Direction (Increase, Decrease, or Any), and enter the change Amount. Choosing Any for the Direction will make the block wait for the sensor value to either increase or decrease by the specified amount.

The final sensor value is output in Measured Value.
Example
This program waits for the Ambient Light Intensity value from the Color Sensor to increase by 10 before driving. You could use this to make your robot start driving when you turn the room lights on or shine a flashlight at the sensor.
Waiting for a Sensor to Change to any Different Value
The following Change modes of the Wait block allow you to wait for a sensor to change to any value that is different than the value at the start of the block:

Brick Buttons – Change – Brick Buttons
Color Sensor – Change – Color
Infrared Sensor – Change – Remote
Touch Sensor – Change – State
Messaging – Change Modes
Brick Buttons – Change – Brick Buttons


The Brick Buttons – Change – Brick Buttons mode waits for any one of the Brick Buttons to be pressed or released. The Button ID of the button that was pressed or released is output in Button ID. See Using the Brick Buttons for more information about the Brick Buttons."
Color Sensor – Change – Color


The Color Sensor – Change – Color mode waits for the color number detected by the Color Sensor in Color mode (0-7) to change. The ending color detected is output in Color. See Using the Color Sensor for more information about using the Color Sensor in Color mode.
Infrared Sensor – Change - Remote


The Infrared Sensor – Change - Remote mode waits for the Button ID from the IR Beacon to change. In most cases, the Button ID will change if any button on the IR Beacon is pressed or released. The Button ID measured after the change is output in Button ID. See Using the Infrared Sensor Remote Mode for more information."
Touch Sensor – Change - State


The Touch Sensor – Change - State mode waits for the state of the touch sensor to change. If the sensor is Released (not pressed) at the start of the block, it will wait for it to be Pressed. If the sensor is Pressed at the start of the block, it will wait for to be Released. The ending state is output in State. See Using the Touch Sensor for more information."
Messaging – Change Modes


The Messaging – Change modes wait for a message of the specified type and Message Title to be received with a value that is different from the last matching message type.

The Messaging – Update modes wait for a message of the matching type (Text, Numeric, or Logic) and Message Title to be received. The message value is output in Message."
Inputs and Outputs
The inputs available for the Wait block will depend on the mode selected. You can enter the input values directly into the block. Alternatively, the input values can be supplied by Data Wires from the outputs of other Programming Blocks.
InputTypeNotes
Seconds NumericNumber of seconds to wait in Time mode.
Compare TypeNumericComparison type for a Sensor Compare Mode with a Threshold Value.
0: = (Equal)
1: ≠ (Not Equal)
2: > (Greater Than)
3: ≥ (Greater Than or Equal To)
4: < (Less Than)
5: ≤ (Less Than or Equal To)
Threshold ValueNumericValue to compare sensor data to for a Sensor Compare Mode with a Threshold Value.
Direction NumericDirection for a Numeric sensor value to change.
Used in Sensor Change Modes that have an Amount input.
0 = Increase
1 = Decrease
2 = Any
Amount NumericAmount for sensor value to change in a Sensor Change Mode
(Inputs for individual sensor types)See the help on the individual sensor types for more information on the sensor data.
The output of the Wait block is the sensor value measured at the end of the wait, for a Sensor Compare or Sensor Change mode. To use the output, use a Data Wire to connect it to a Programming Block inside or after the loop.
OutputTypeNotes
(Outputs vary for sensor types)See the help mode on the individual sensor types for more information on the sensor data.
Measured Value NumericThe sensor value after the wait.
Wait
Quick links